Note: This guide applies to AI tools that support MCP (Model Context Protocol), such as Claude, Gemini, Codex, and other MCP-compatible environments.
MCP works by allowing AI tools to connect directly to external servers and dynamically access capabilities at runtime. Only tools built with native MCP support can use this setup. Platforms that rely on pre-built integrations or connector-based architectures (instead of MCP) will not be able to use this approach.
The Forge MCP Server connects your Salesforge stack to AI assistants that support the Model Context Protocol such as Claude, Cursor, and Windsurf.
Once connected, you can run your entire outbound workflow using natural language instead of clicking through dashboards.
This includes:
Creating and enriching leads
Building LinkedIn and email outreach sequences
Managing domains and mailboxes
Tracking campaign performance
Instead of switching between tools, you can simply ask your AI assistant to do the work.
Most outbound workflows are fragmented. You find leads in one place, enrich them in another, write messages somewhere else, and send campaigns from a separate tool.
The Forge MCP Server removes that friction.
You can do everything in one conversational flow:
Find LinkedIn profiles
Enrich them with emails and data
Write outreach messages
Launch sequences
Monitor replies and performance
This is especially powerful for LinkedIn first outbound strategies where personalization and speed matter.
The Model Context Protocol was developed by Anthropic as an open standard that allows AI assistants to securely interact with external tools.
Key points
Your API keys stay on your machine
The AI assistant does not store credentials
All actions are executed via authenticated API requests
Think of it as giving your AI assistant controlled access to your Salesforge workspace.
The MCP server supports all Forge products through a single endpoint:
Salesforge - Workspaces, contacts, sequences, mailboxes, sender profiles, enrollments, webhooks, email validation, do-not-contact lists
Primeforge - Workspaces, domains, mailboxes, DNS management, prewarmed mailboxes
Leadsforge - Contact search, email/phone/LinkedIn enrichment, lookalike search
Infraforge - Workspaces, domains, mailboxes, DNS, domain availability, credits
Warmforge - Mailboxes, warmup stats, placement tests
Mailforge - Workspaces, domains, mailboxes, DNS, domain availability
You only need API keys for the products you use.
Tools for unconfigured products will not appear.
LinkedIn is not just an add on channel. It is often the highest converting entry point for outbound.
With MCP, LinkedIn becomes tightly integrated with cold email instead of separate from it.
You can:
Search for ICP matched profiles
Enrich them with verified emails
Send LinkedIn connection requests
Follow up with LinkedIn messages
Move engaged leads into email sequences
This creates a multi channel system instead of isolated campaigns.
Use Leadsforge to find relevant LinkedIn profiles
Enrich contacts with email and company data
Send a connection request on LinkedIn
If accepted, send a follow up message
If no reply, move the lead into a cold email sequence
Track engagement across both channels
This is where MCP becomes powerful. You can execute all of this through simple prompts.
An account on one or more Salesforge products with API access
An MCP-compatible AI client (Claude Desktop, Claude Code, Cursor, Windsurf, etc.)
Node.js installed on your machine (required for Claude Desktop via npx)
Generate API keys for each product you want to connect:
Salesforge: Log in at app.salesforge.ai, go to Settings > API, click Generate API Key
Primeforge: Log in at app.primeforge.ai, go to Settings > API, click Generate API Key
Leadsforge: Log in at app.leadsforge.ai, go to Settings > API, click Generate API Key
Infraforge: Log in at app.infraforge.ai, go to Settings > API, click Generate API Key
Warmforge: Log in at app.warmforge.ai, go to Settings > API, click Generate API Key
Copy each key and store it somewhere safe. You will need them in the next step.
Open Claude Desktop
Go to Settings > Developer > Edit Config
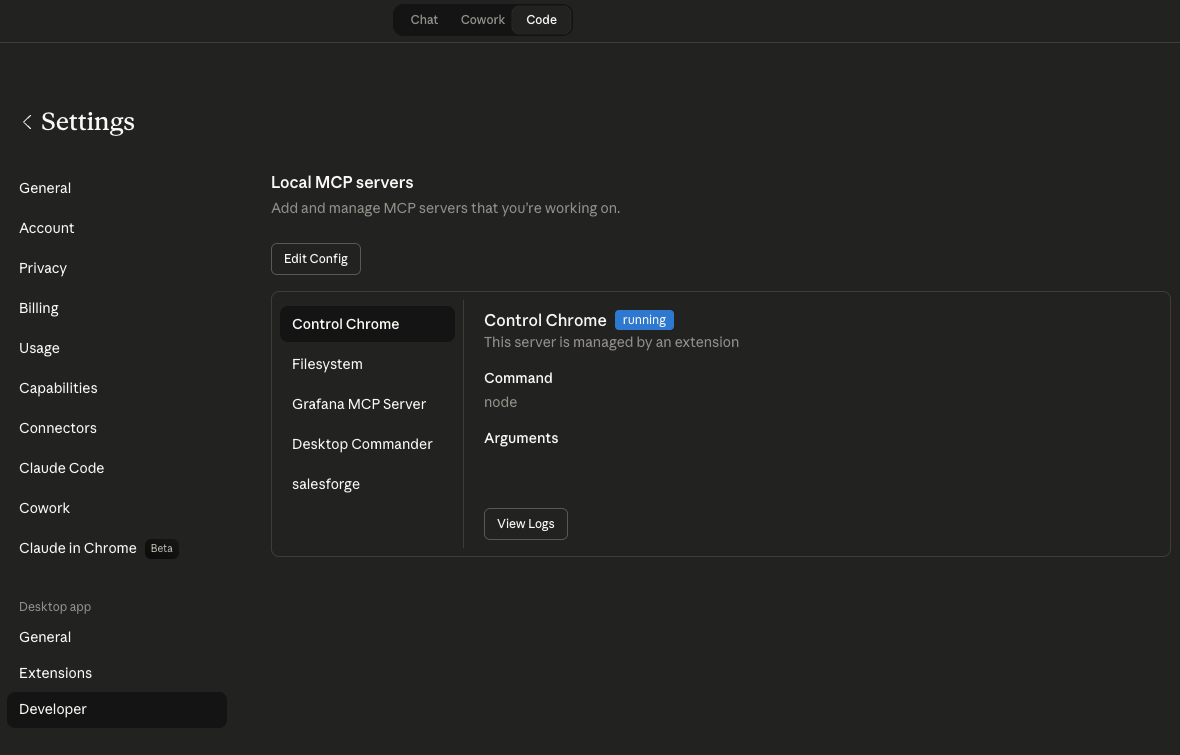
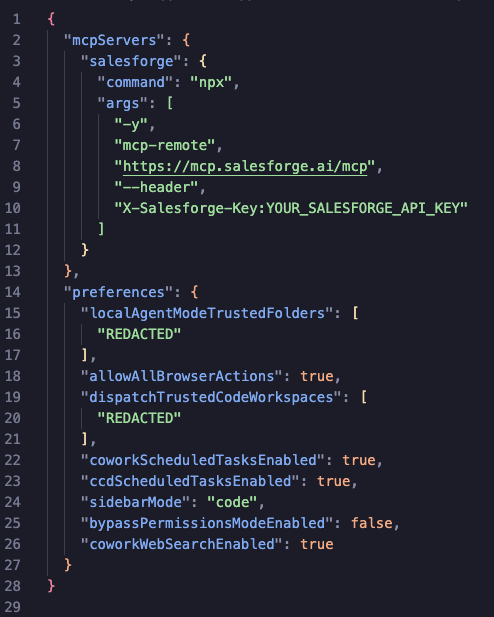
This opens the claude_desktop_config.json file. Add the following configuration:
{
  "mcpServers": {
    "salesforge": {
      "command": "npx",
      "args": [
        "-y",
        "mcp-remote",
        "https://mcp.salesforge.ai/mcp",
        "--header",
        "X-Salesforge-Key:YOUR_SALESFORGE_API_KEY",
        "--header",
        "X-Primeforge-Key:YOUR_PRIMEFORGE_API_KEY",
        "--header",
        "X-Leadsforge-Key:YOUR_LEADSFORGE_API_KEY",
        "--header",
        "X-Infraforge-Key:YOUR_INFRAFORGE_API_KEY",
        "--header",
        "X-Warmforge-Key:YOUR_WARMFORGE_API_KEY"
      ]
    }
  }
}
Replace each YOUR_…_API_KEY placeholder with the key you generated in Step 1. Remove any —header entries for products you do not use. If you use only one product only add that header, no need to add others.
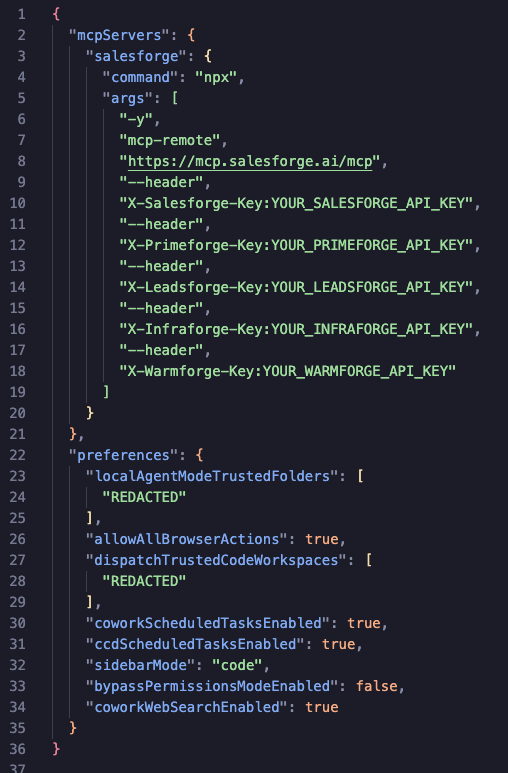
Final file should look something like this:
With one product:
With multiple products:
Save the file and restart Claude Desktop.
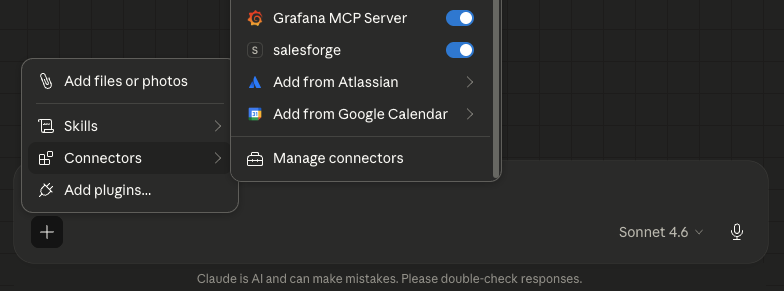
Make sure your new MCP is enabled in chat
If you use Claude Code (the CLI tool), add the server to your project or global settings:
claude mcp add salesforge \
  --transport streamable-http \
  --url https://mcp.salesforge.ai/mcp \
  --header "X-Salesforge-Key: YOUR_SALESFORGE_API_KEY" \
  --header "X-Primeforge-Key: YOUR_PRIMEFORGE_API_KEY" \
  --header "X-Leadsforge-Key: YOUR_LEADSFORGE_API_KEY" \
  --header "X-Infraforge-Key: YOUR_INFRAFORGE_API_KEY" \
  --header "X-Warmforge-Key: YOUR_WARMFORGE_API_KEY"
  --header "X-Mailforge-Key: YOUR_MAILFORGE_API_KEY"
Only include the headers for products you have API keys for.
If you use Cursor, go to Settings > MCP and add a new server with these details:
Name: salesforge
Type: streamable-http
URL: https://mcp.salesforge.ai/mcp
Headers: Add the product-specific headers listed in the Authentication Headers Reference table below
After setup, try asking your AI assistant:
"List my Salesforge workspaces"
"Show my Primeforge domains"
"What is my Leadsforge credit balance?"
"List my Infraforge mailboxes"
"Show my Warmforge warmup stats"
If the connection is working, you will see data from your account.
ProductHeaderFormat | ||
Salesforge | X-Salesforge-Key | YOUR_API_KEY |
Primeforge | X-Primeforge-Key | YOUR_API_KEY |
Leadsforge | X-Leadsforge-Key | YOUR_API_KEY |
Infraforge | X-Infraforge-Key | YOUR_API_KEY |
Warmforge | X-Warmforge-Key | YOUR_API_KEY |
Mailforge | X-Mailforge-Key | YOUR_API_KEY |
If you manage multiple Salesforge accounts (for example, separate accounts for different clients), you can run multiple instances of the MCP server side by side. Each instance connects to one account with its own set of API keys.
In Claude Desktop, add a separate entry for each account:
  "mcpServers": {
    "salesforge-client-a": {
      "command": "npx",
      "args": [
        "-y",
        "mcp-remote",
        "https://mcp.salesforge.ai/mcp",
        "--header",
        "X-Salesforge-Key:CLIENT_A_SALESFORGE_KEY",
        "--header",
        "X-Primeforge-Key:CLIENT_A_PRIMEFORGE_KEY"
      ]
    },
    "salesforge-client-b": {
      "command": "npx",
      "args": [
        "-y",
        "mcp-remote",
        "https://mcp.salesforge.ai/mcp",
        "--header",
        "X-Salesforge-Key:CLIENT_B_SALESFORGE_KEY",
        "--header",
        "X-Primeforge-Key:CLIENT_B_PRIMEFORGE_KEY"
      ]
    }
  }
}
Each entry gets its own name (like "salesforge-client-a" and "salesforge-client-b"). The AI assistant will see tools from both accounts and you can specify which client you want to work with in your prompts.
The same approach works for Claude Code and Cursor. Just add multiple server entries with different names pointing to the same URL but with different API keys.
Tools not showing up: Make sure you restarted your AI client after editing the config. Verify the API key is correct.
Authentication errors: Double-check the API key. Make sure the API key is entered directly after the header name with no space (e.g., X-Salesforge-Key:YOUR_KEY).
"Invalid workspace" errors: Some tools require a workspace ID. Use the list workspaces tool first to get valid IDs.
Missing product tools: Tools only appear for products where you have provided a valid API key.